Tiks izdzēsta lapa "6. Layout Composition". Pārliecinieties, ka patiešām to vēlaties.
6 Abstract Layout
Most interface toolkits employ the concrete layout model, that is, control positioning in the dialog is absolute in coordinates relative to the top-left corner of the dialog’s client area. This makes it easy to position the controls on it by using an interactive tool usually provided with the system. It is also easy to dimension them. Of course, this positioning intrinsically depends on the graphics system’s resolution. Moreover, when the dialog size is altered, the elements remain on the same place, thus generating an empty area below and to the right of the elements. Besides, if the graphics system’s resolution changes, the dialog inevitably will look larger or smaller according to the resolution increase or decrease.
IUP implements an abstract layout concept, in which the positioning of controls is done relatively instead of absolutely. For such, composition elements are necessary for composing the interface elements. They are boxes and fillings invisible to the user, but that play an important part. When the dialog size changes, these containers expand or retract to adjust the positioning of the controls to the new situation.
Watch the code below. The IUP specification is simpler, though a little larger. In fact, creating a dialog on IUP with several elements will force you to plan your dialog more carefully – on the other hand, this will actually make its implementation easier.
Moreover, this Eiffel-IUP dialog has an indirect advantage: if the user changes its size, the elements (due to being positioned on an abstract layout) are automatically re-positioned horizontally.
The composition elements includes vertical boxes (IUP_VBOX), horizontal boxes (IUP_HBOX) and filling (IUP_FILL). There is also a depth box (IUP_ZBOX) in which layers of elements can be created for the same dialog, and the elements in each layer are only visible when that given layer is active.
class LAYOUT

inherit
    IUP_INTERFACE

create
   make

feature

   make
      local
            gui: IUP
            i: STRING
            f1, f2: IUP_FILL
            b1, b2: IUP_BUTTON
            h: IUP_HBOX
            w: IUP_DIALOG
      do
            gui := iup_open

            create f1.fill
            create f2.fill

            create b1.button("OK")
            b1.set_size(40, 0) -- 0 mean use the calculate height
            create b2.button("Cancel")
            b2.set_size(40, 0) -- 0 mean use the calculate height

            create h.hbox({ARRAY[IUP_WIDGET]} << f1, b1, b2, f2 >>)
            h.set_gap(10)
            h.set_margin(15, 15)

            create w.dialog(h)

            w.set_title("Title")
            i := w.show

            gui.main_loop
            gui.close
      end

end
6.1 Layout Guide
6.1.1 Native Sizes (Window and Client)
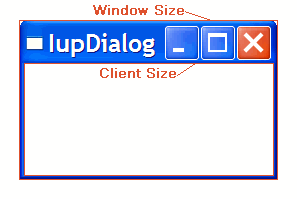
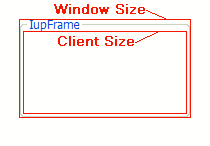
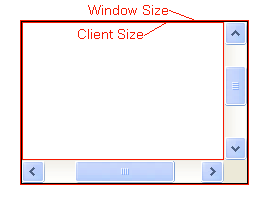
Because of the dynamic nature of the abstract layout IUP elements have implicit many types of size. But the native elements have only two types of size: Window and Client. The Window size reflects the bounding rectangle of the element. The Client size reflects the inner size of the window that excludes the decorations and margins. For many elements these two sizes are equal, but for many containers they are quite different. See some examples below.
The IUP sizes (User, Natural and Current) described below are all related to the Window size.
The native Client size is used only internally to reposition the elements in the abstract layout, but it is available using the client size attribute.
6.1.2 IUP Sizes
6.1.2.1 Natural Size
IUP does not require that the application specifies the size of any element. The sizes are automatically calculated so the contents of each element is fully displayed. This size is called Natural size. The Natural size is calculated just before the element is mapped to the native system and every time map is called, even if the element is already mapped.
The Natural size of a container is the size that allows all the elements inside the container to be fully displayed. Then the Natural size is calculated from the inner element to the outer element (the dialog). Important: even if the element is invisible its size will be included in the size of its containers, except when disable_floating is called at some widget.
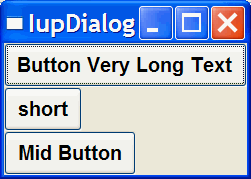
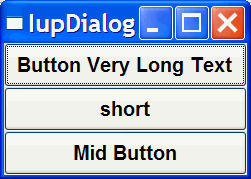
So consider the following code and its result. Each button size is large enough to display their respective text. If the dialog size is increased or reduced by the size handlers in the dialog borders the buttons do not move or change their sizes.
But notice that some controls do not have contents that can provide a Natural size. In this case they usually have size or raster size pre-set.
To obtain the last computed Natural size of the control in pixels, use the read-only feature get_natural_size.
        create b1.button("Button Very Long Text")
        create b2.button("Cancel")
        create b3.button("Mid Button")

        create v.vbox({ARRAY[IUP_WIDGET]} << b1, b2, b3 >>)

        create w.dialog(v)

        w.set_title("IupDialog")
        w.set_font("Helvetica, Bold 14")
        i := w.show
6.1.2.2 User Size
When the application defines the size or raster size attributes, it changes the User size in IUP. The initial internal value is "0x0". If the element is not mapped then the returned value by size or raster size is the User size, if the element is mapped then the returned value is the Current size. To obtain the User size after the element is mapped use the get_user_size feature.
By default the layout computation uses the Natural size of the element to compose the layout of the dialog, but if the User size is defined then it is used instead of the Natural size. In this case the Natural size is not even computed. But there are two exceptions.
If the element is a container (not including the dialog) the User size will be used instead of the Natural size only if bigger than the Natural size. So for containers the User size will also act as a minimum value for Natural size.
For the dialog, if the User size is defined then it is used instead of the Natural size, but the Natural size of the dialog is always computed. And if the User size is not defined, the Natural size is used only if bigger than the Current size, so in this case the dialog will always increase its size to fit all its contents. In other words, in this case the dialog will not shrink its Current size unless the User size is defined. See the Shrink attribute guide bellow for an alternative.
When the user is interactively changing the dialog size the Current size is updated. But the dialog contents will always occupy the Natural size available, being smaller or bigger than the dialog Current size.
When size or raster size attributes are set for the dialog (changing the User size) the Current size is also reset to "0x0". Allowing the application to force an update of its Window size. To only change the User size in pixels, without resetting the Current size, use the set_user_size feature.
6.1.2.3 Current Size
After the Natural size is calculated for all the elements in the dialog, the the Current size is set based on the available space in the dialog. So the Current size is set from the outer element (the dialog) to the inner element, in opposite of what it is done for the Natural size.
After all the elements have their Current size updated, the elements positions are calculated, and finally, after the element is mapped, the Window size and position are set for the native elements. The Window size is set exactly to the Current size.
After the element is mapped the returned value for size or raster size is the Current size. It actually returns the native Window size of the element. Before mapping, the returned value is the User size.
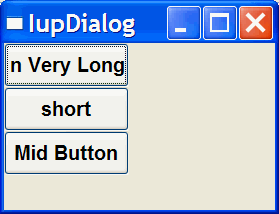
Defining the size attribute of the buttons in the example we can make all have the same size. The 0 for the height mean that the calculated height should be used. (In the following example the dialog size was changed after it was displayed on screen)
        create b1.button("Button Very Long Text")
        b1.set_size(50, 0)
        create b2.button("Cancel")
        b2.set_size(50, 0)
        create b3.button("Mid Button")
        b2.set_size(50, 0)

        create v.vbox({ARRAY[IUP_WIDGET]} << b1, b2, b3 >>)

        create w.dialog(v)

        w.set_title("IupDialog")
        w.set_font("Helvetica, Bold 14")
        i := w.show
So when remove_expand is called (see below) for elements that are not containers if User size is defined then the Natural size is ignored.
If you want to adjust sizes in the dialog do it after the layout size and positioning are done, i.e. after the dialog is mapped or after refresh is called.
6.1.2.4 EXPAND
Another way to increase the size of elements is to use the expand attribute. When there is room in the container to expand an element, the container layout will expand the elements that have the expand attribute set to both directions (YES), horizontal (HORIZONTAL) or vertical (VERTICAL) accordingly, even if they have the User size defined.
The default is EXPAND=NO (remove_expand), but for containers is EXPAND=YES (both directions).
Using expand in the example, we obtain the following result:
        create b1.button("Button Very Long Text")
        create b2.button("Cancel")
        b2.expand_horizontal
        create b3.button("Mid Button")
        b2.expand_horizontal

        create v.vbox({ARRAY[IUP_WIDGET]} << b1, b2, b3 >>)

        create w.dialog(v)

        w.set_title("IupDialog")
        w.set_font("Helvetica, Bold 14")
        i := w.show
So for elements that are NOT containers, when expand is enabled the Natural size and the User size are ignored.
For containers the default behavior is to always expand or if expand is disabled they are limited to the Natural size. As a consequence (if the User size is not defined in all the elements) the dialog contents can only expand and its minimum size is the Natural size, even if expand is enabled for its elements. In fact the actual dialog size can be smaller, but its contents will stop to follow the resize and they will be clipped at right and bottom.
If the expansion is in the same direction of the box, for instance vertical in the IUP_VBOX of the previous example, then the expandable elements will receive equal spaces to expand according to the remaining empty space in the box. This is why elements in different boxes does not align perfectly when expand is set.
6.1.2.5 SHRINK
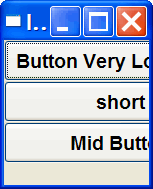
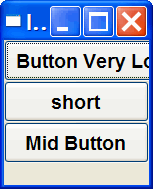
To reduce the size of the dialog and its containers to a size smaller than the Natural size the shrink attribute of the dialog can be used. If set to True all the containers of the dialog will be able to reduce its size. But be aware that elements may overlap and the layout result could be visually bad if the dialog size is smaller than its Natural size.
Notice that in the example the dialog initial size will be 0x0 because it is not defined. The picture shown was captured after manually resizing the dialog. So when using shrink usually you will also need to set the dialog initial size.
        create b1.button("Button Very Long Text")
        create b2.button("Cancel")
        b2.expand_horizontal
        create b3.button("Mid Button")
        b2.expand_horizontal

        create v.vbox({ARRAY[IUP_WIDGET]} << b1, b2, b3 >>)

        create w.dialog(v)

        w.set_title("IupDialog")
        w.set_shrink(True)
        w.set_font("Helvetica, Bold 14")
        i := w.show
6.1.3 Layout Hierarchy
The layout of the elements of a dialog in IUP has a natural hierarchy because of the way they are composed together.
To create a node simply create and add an elelemnt like IUP_LABEL, IUP_BUTTON, IUP_CANVAS, and so on. To create a branch just create and add a container like IUP_DIALOG, IUP_FRAME, IUP_VBOX, and so on. Internally they all call create to create branches or nodes. To destroy a node or branch call destroy.
Some of the elements already append children to its branch, but you can add other children using append or insert. To remove from the tree call detach.
For the element to be visible map must be called so it can be associated with a native control. show, show_xy or popup will automatically call map before showing a dialog. To remove this association call unmap.
But there is a call order to be able to call theses functions that depends on the state of the element. As you can see from these functions there are 3 states: created, appended and mapped. From created to mapped it is performed one step at a time. Even when the constructor receives the children as a parameter append is called internally. When you detach an element it will be automatically unmapped if necessary. When you destroy an element it will be automatically detached if necessary. So explicitly or implicitly, there will be always a call to:
    create  -> append -> map
    destroy <- detach <- unmap
A more simple and fast way to move an element from one position in the hierarchy to another is using reparent.
The dialog is the root of the hierarchy tree. To retrieve the dialog of any element you can simply call get_dialog, but there are other ways to navigate in the hierarchy tree.
To get all the children of a container call get_child or get_next_child. To get just the next control with the same parent use get_brother. To get the parent of a control call get_parent.
6.1.4 Layout Display
The layout size and positioning is automatically updated by map. map also updates the dialog layout even if it is already mapped, so using it or using show, show_xy or popup (they all call map) will also update the dialog layout. The layout size and positioning can be manually updated using refresh, even if the dialog is not mapped.
After changing containers attributes or element sizes that affect the layout the elements are NOT immediately repositioned. Call refresh for an element inside the dialog to update the dialog layout.
The Layout update is done in two phases. First the layout is computed, this can be done without the dialog being mapped. Second is the native elements update from the computed values.
The Layout computation is done in 3 steps: Natural size computation, update the Current size and update the position.
The Natural size computation is done from the inner elements up to the dialog (first for the children then the element). User size (set by raster size or size) is used as the Natural size if defined, if not usually the contents of the element are used to calculate the Natural size.
Then the Current size is computed starting at the dialog down to the inner elements on the layout hierarchy (first the element then the children). Children Current size is computed according to layout distribution and containers decoration. At the children if expand is set, then the size specified by the parent is used, else the natural size is used.
Finally the position is computed starting at the dialog down to the inner elements on the layout hierarchy, after all sizes are computed.
6.1.5 Element Update
Usually IUP automatically updates everything for the application, for instance there is no need to force a display update after an attribute is changed. But there are some situations where you need to force an update. Here is a summary of the functions that can be used to update an element state:
update - update the element look by letting the system to schedule a redraw.
redraw - has the same effect of update but forces the element to redraw now.
refresh - if the application changed some attribute that affects the natural size, for instance size or raster size among others, the actual element size is NOT immediately updated. That's because it can affect the size and position of other elements in the dialog. refresh will force an update in the layout of the whole dialog, and of course if an element has its size changed its appearance will be automatically updated.
flush - process all events that are waiting to be processed. When you set an attribute, a system event is generated, but it will wait until is processed by the event loop. Sometimes the application needs an immediate result, so calling flush will process that event but it will also process every other event that was waiting to be processed, so other callbacks could be trigger during flush call.

